|
GeNN
2.2.3
GPU enhanced Neuronal Networks (GeNN)
|
|
GeNN
2.2.3
GPU enhanced Neuronal Networks (GeNN)
|
In this tutorial we will go through step by step instructions how to create and run a GeNN simulation starting from scratch. Normally, we recommend users to use one of the example projects as a starting point but it can be very instructive to go through the necessary steps one by one once to appreciate what parts make a GeNN simulation.
In this tutorial we will use a pre-defined neuron model type (TRAUBMILES) and create a simulation of ten Hodgkin-Huxley neurons [5] without any synaptic connections. We will run this simulation on a GPU and save the results to stdout.
The first step is to write a model definition function in a model definition file. Create a new empty file tenHHModel.cc with your favourite editor, e.g.
The model definition file contains the definition of the network model we want to simulate. First, we need to include the GeNN model specification code modelSpec.h. Then the model definition takes the form of a function named modelDefinition that takes one argument, passed by reference, of type NNmodel. Type in your tenHHModel.cc file:
Now we need to fill the actual model definition. Three standard elements to the `modelDefinition function are initialising GeNN, setting the simulation step size and setting the name of the model:
0.1 in the usual time units. The typical units in GeNN are ms, mV, nF, and \form#10S. Therefore, this defines DT= 0.1 ms. The name of the model given in the setName method does not need to match the file name of the model definition file. However, we strongly recommend it and if conflicting, the file name of the model definition file will prevail.Making the actual model definition makes use of the addNeuronPopulation and 'addSynapsePopulationmember functions of the NNmodel object. The arguments to a call toaddNeuronPopulations are
string name: the name of the population int N: The number of neurons in the population int type: The type of neurons in the population double *p: An array of parameter values for teh neurons in the population double *ini: An array of initial values for neuron variablesWe first create the parameter and initial variable arrays,
Having defined the parameter values and initial values we can now create the neuron population,
TRAUBMILES is a variable defined in the GeNN model specification that contains the index number of the pre-defined Traub & Miles model [5].The model definition then needs to end on calling
This completes the model definition in this example. The complete tenHHModel.cc file now should look like this:
This model definition suffices to generate code for simulating the ten Hodgkin-Huxley neurons on the a GPU or CPU. The second part of a GeNN simulation is the user code that sets up the simulation, does the data handling for input and output and generally defines the numerical experiment to be run.
For the purposes of this tutorial we will initially simply run the model for one simulated second and record the final neuron variables into a file. GeNN provides the code for simulating the model in a function called stepTimeCPU() (execution on CPU only) or stepTimeGPU() (execution on a GPU). To make use of this code, we need to define a minimal C/C++ main function. Open a new empty file tenHHSimulation.cc in an editor and type
This boiler plate code includes the relevant model definition file we completed earlier and the header file of entry point to the generated code definitions.h in the subdirectory tenHHModel_CODE where GeNN deposits all generated code.
Calling allocateMem() allocates the memory structures for all neuron variables and initialize() sets the initial values and copies values to the GPU.
Now we can use the generated code to execute the integration of the neuron equations provided by GeNN. To do so, we add after initialize();
and we need to copy the result, and output it to stdout,
pullPop1fromDevice() copies all relevant state variables of the Pop1 neuron group from the GPU to the CPU main memory. Then we can output the results to stdout by looping through all 10 neurons and outputting the state variables VPop1, mPop1, hPop1, nPop1.
Pop1.This completes the user code. The complete tenHHSimulation.cu file should now look like
A GeNN simulation is built with a simple Makefile. On Unix systems we typically name it GNUmakefile. Create this file and enter
This defines that the final executable of this simulation is named tenHHSimulation and the simulation code is given in the file tenHHSimulation.cu that we completed above.
Now we are ready to compile and run the simulation
To build the model and generate the GeNN code, type in a terminal where you are in the directory containing your tenHHModel.cc file,
If your environment variables GENN_PATH and CUDA_PATH are correctly configured, you should see some compile output ending in Model build complete .... Now type
This should compile your tenHHSimulation executable and you can execute it with
The output you obtain should look like
This completes this tutorial. You have created a GeNN model and simulated it successfully!
In the example we have created so far, the neurons are not connected and do not receive input. As the TRAUBMILES model is silent in such conditions, the ten neurons simply will simply rest at their resting potential. To make things more interesting, let us add a constant input to all neurons, add to the end of the modelDefinition function
This will add a constant input of 0.1 nA to all ten neurons. When run with this addition you should observe the output
This is still not particularly interesting as we are just observing the final value of the membrane potentials. To see what is going on in the meantime, we need to copy intermediate values from the device and best save them into a file. This can be done in many ways but one sensible way of doing this is to replace the line
in tenHHSimulation.cu to something like this:
After building, making and executing,
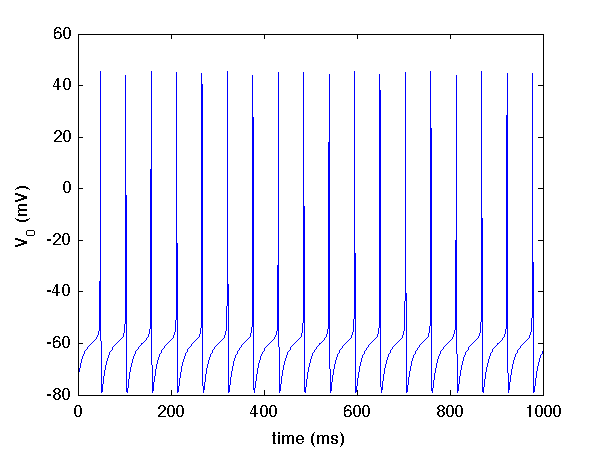
there should be a file tenHH_output.V.dat in the same directory. If you plot column one (time) against column two (voltage of neuron 0), you should observe dynamics like this:
The completed files from this tutorial can be found in userproject/tenHH_project.
 1.8.11
