Defining populations of neurons
In this tutorial we’re going to define a population of Izhikevich neurons and configure individual neurons within it to operate in various regimes: 
(Electronic version of the figure and reproduction permissions are freely available at www.izhikevich.com) ## Install PyGeNN wheel from Google Drive Download wheel file
[1]:
if "google.colab" in str(get_ipython()):
    !gdown 128FKTJ1GVF7TgwT9-4o7r4eWqduMYVO4
    !pip install pygenn-5.4.0-cp312-cp312-linux_x86_64.whl
    %env CUDA_PATH=/usr/local/cuda
Downloading...
From: https://drive.google.com/uc?id=1wUeynMCgEOl2oK2LAd4E0s0iT_OiNOfl
To: /content/pygenn-5.1.0-cp311-cp311-linux_x86_64.whl
100% 8.49M/8.49M [00:00<00:00, 18.8MB/s]
Processing ./pygenn-5.1.0-cp311-cp311-linux_x86_64.whl
Requirement already satisfied: numpy>=1.17 in /usr/local/lib/python3.11/dist-packages (from pygenn==5.1.0) (1.26.4)
Requirement already satisfied: psutil in /usr/local/lib/python3.11/dist-packages (from pygenn==5.1.0) (5.9.5)
Requirement already satisfied: setuptools in /usr/local/lib/python3.11/dist-packages (from pygenn==5.1.0) (75.1.0)
pygenn is already installed with the same version as the provided wheel. Use --force-reinstall to force an installation of the wheel.
env: CUDA_PATH=/usr/local/cuda
Build model
Import numpy, matplotlib and the main GeNNModel class from PyGeNN
[2]:
import numpy as np
import matplotlib.pyplot as plt

from pygenn import GeNNModel
Create a new model called “tutorial1” with floating point precision and set the simulation timestep to 0.1ms
[3]:
model = GeNNModel("float", "tutorial1")
model.dt = 0.1
Configure initial state for a population of Izhikevich neurons with a constant value for the V and U state variables and different values for the a, b, c and d parameters (because we are going to be using the IzhikevichVariable model, the parameters are also implemented as state variables so they can vary across the population of neurons)
[4]:
izk_init = {"V": -65.0,
            "U": -20.0,
            "a": [0.02,     0.1,    0.02,   0.02],
            "b": [0.2,      0.2,    0.2,    0.2],
            "c": [-65.0,    -65.0,  -50.0,  -55.0],
            "d": [8.0,      2.0,    2.0,    4.0]}
Add a population of 4 of these neurons (GeNN’s built in models are selected by specifying model as a string)
[5]:
pop = model.add_neuron_population("Neurons", 4, "IzhikevichVariable", {}, izk_init)
Add a DC (i.e. constant) current input to the population to inject a constant current into the neurons and make them spike
[6]:
model.add_current_source("CurrentSource", "DC", pop, {"amp": 10.0}, {});
Generate code and load it into PyGeNN
[7]:
model.build()
model.load()
Simulate tutorial model
State variables in the GeNN model can be accessed directly using memory views. Create a memory view to access the membrane voltage of our neurons
[8]:
voltage = pop.vars["V"]
We want to record these voltages for each neuron every timestep so, after every we simulate each time step, we copy the membrane voltage back from the GPU and add a copy (because the memory view gives access to the actual simulator state we need to make a copy) to a list
[9]:
voltages = []
while model.t < 200.0:
    model.step_time()
    voltage.pull_from_device()
    voltages.append(voltage.values)
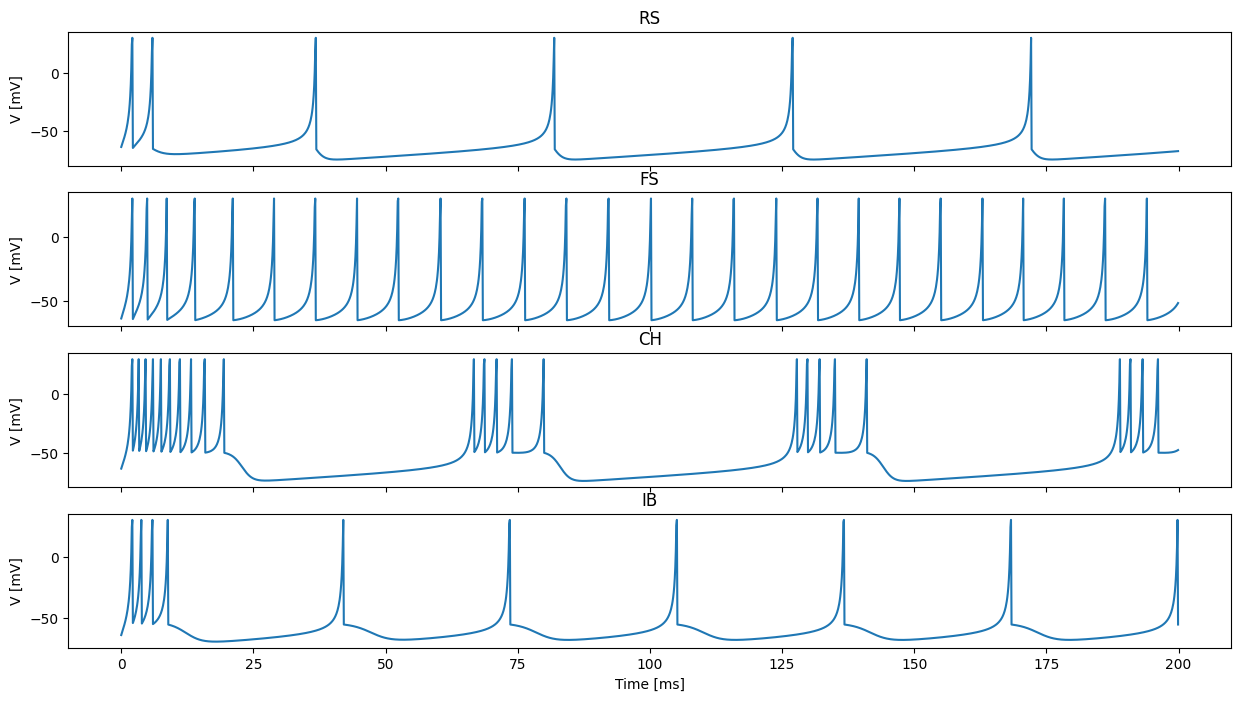
Plot the voltages over time in 4 seperate panels
[10]:
# Stack voltages together into a 2000x4 matrix
voltages = np.vstack(voltages)

# Create figure with 4 axes
fig, axes = plt.subplots(4, sharex=True, figsize=(15, 8))

# Plot voltages of each neuron in
for i, t in enumerate(["RS", "FS", "CH", "IB"]):
    axes[i].set_title(t)
    axes[i].set_ylabel("V [mV]")
    axes[i].plot(np.arange(0.0, 200.0, 0.1), voltages[:,i])

axes[-1].set_xlabel("Time [ms]");
Exercises
Add three more neurons with the remaining neuron types: Thalamo-cortical, resonator, and low-threshold spiking.
Make a neuron that changes its type gradually from the beginning to the end of the simulation. Use a longer simulation time to make this meaningful.