|
GeNN
4.9.0
GPU enhanced Neuronal Networks (GeNN)
|
|
GeNN
4.9.0
GPU enhanced Neuronal Networks (GeNN)
|
You can download GeNN either as a zip file of a stable release or a snapshot of the most recent stable version or the unstable development version using the Git version control system.
Point your browser to https://github.com/genn-team/genn/releases and download a release from the list by clicking the relevant source code button. After downloading continue to install GeNN as described in the Installing GeNN section below.
If it is not yet installed on your system, download and install Git (http://git-scm.com/).Then clone the GeNN repository from Github
The github url of GeNN in the command above can be copied from the HTTPS clone URL displayed on the GeNN Github page (https://github.com/genn-team/genn).
This will clone the entire repository, including all open branches. By default git will check out the master branch which contains the source version upon which the next release will be based. There are other branches in the repository that are used for specific development purposes and are opened and closed without warning.
Installing GeNN comprises a few simple steps to create the GeNN development environment:
(i) If you have downloaded a zip file, unpack GeNN.zip in a convenient location. Otherwise enter the directory where you downloaded the Git repository.
(ii) Add GeNN's 'bin' directory to your path, e.g. if you are running Linux or Mac OS X and extracted/downloaded GeNN to $HOME/GeNN, this can be done with:
to make this change persistent, this can be added to your login script (e.g. .profile or .bashrc) using your favourite text editor or with:
. If you are using Windows, the easiest way to modify the path is by using the 'Environment variables' GUI, which can be accessed by clicking start and searching for (by starting to type) 'Edit environment variables for your account'. In the upper 'User variables' section, scroll down until you see 'Path', select it and click 'Edit'. Now add a new directory to the path by clicking 'New' in the 'Edit environment variable' window e.g.:
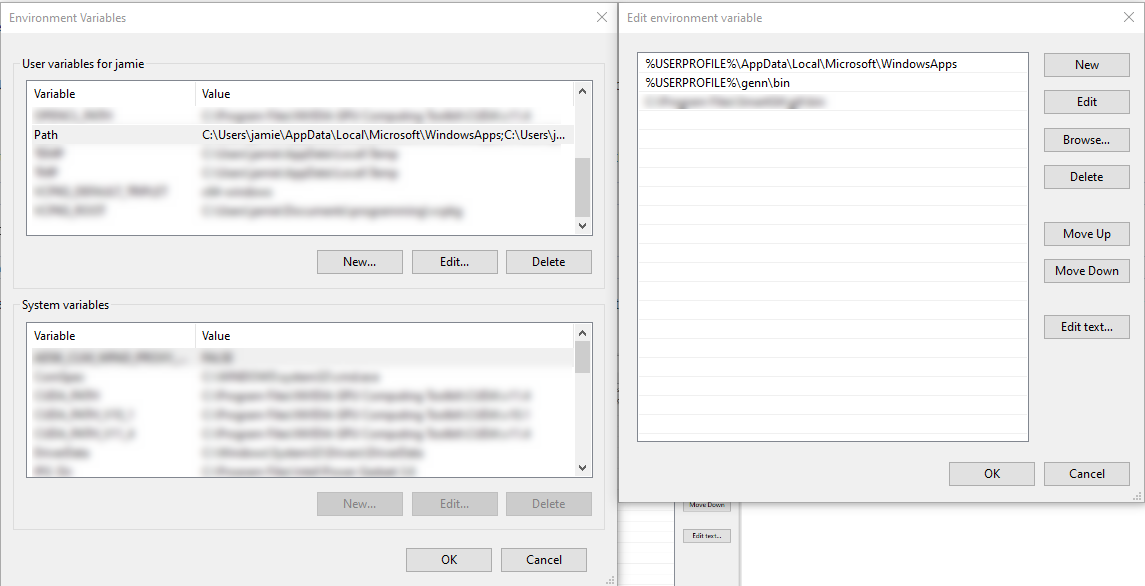
USERPROFILE% is an environment variable which points to the current user's home directory) called genn.
(iv) Install the C++ compiler on the machine, if not already present. For Windows, download Microsoft Visual Studio Community Edition from https://www.visualstudio.com/en-us/downloads/download-visual-studio-vs.aspx. When installing Visual Studio, one should select the 'Desktop development with C++' configuration. Mac users should download and set up Xcode from https://developer.apple.com/xcode/index.html , Linux users should install the GNU compiler collection gcc and g++ from their Linux distribution repository, or alternatively from https://gcc.gnu.org/index.html
(v) If your machine has a GPU and you haven't installed CUDA already, obtain a fresh installation of the NVIDIA CUDA toolkit from https://developer.nvidia.com/cuda-downloads Again, be sure to pick CUDA and C++ compiler versions which are compatible with each other. The latest C++ compiler need not necessarily be compatible with the latest CUDA toolkit.
(vi) GeNN uses the CUDA_PATH environment variable to determine which version of CUDA to build against. On Windows, this is set automatically when installing CUDA. However, if you choose, you can verify which version is selected by looking for the CUDA_PATH environment variable in the lower 'System variables' section of the GUI you used to configure the path:
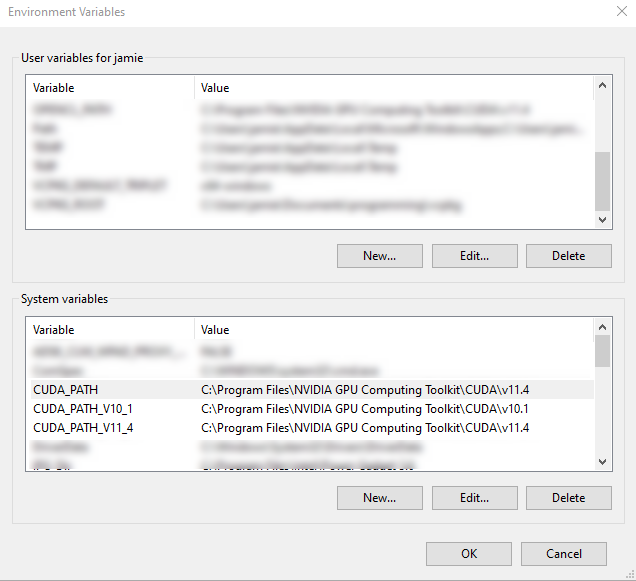
CUDA_PATH. However, on Linux and Mac you need to set CUDA_PATH manually with: assuming CUDA is installed in /usr/local/cuda (the standard location on Ubuntu Linux). Again, to make this change persistent, this can be added to your login script (e.g. .profile or .bashrc)
This normally completes the installation. Windows users must close and reopen their command window so changes to the path take effect.
If you are using GeNN in Windows, the Visual Studio development environment must be set up within every instance of the CMD.EXE command window used. One can open an instance of CMD.EXE with the development environment already set up by navigating to Start - All Programs - Microsoft Visual Studio - Visual Studio Tools - x64 Native Tools Command Prompt. You may also wish to create a shortcut for this tool on the desktop, for convenience.
activate.bat in its Scripts directory. For example, if your user is called "me" and Anaconda is installed in your home directory, you would run: conda install swig command. 1.8.13